After I had published the City of Heroes guides I had started passing them around to the companies whose products I had used, notifying Transgaming, NCSoft, and posting on the City of Heroes forums. Another City of Heroes player responded to the effect of, thanks, but the game works under WINE, which is Free. After bashing my head against a brick wall, I tried to communicate to the player why subscribing to Cedega is a better option for the future of City of Heroes on Linux. The fact is, Transgaming uses the same engine in their Cedega and Cider software. Improvements and feedback from both sides of the engine can help Transgaming locate and address problems with their engine, or determine if the problem is with the game or application itself.
Now, last year I published an editorial detailing an approach that would make gaming on Linux viable and profitable to Game Publishers. I used Valve as an example of a company that could use it's influence as a major publisher to address many of the issues that hamper "gaming on Linux" today. The synopsis is that as a publisher, a company like Valve would be responsible for dictating the API's for game development to the developer, as well as providing a static game distribution method. In return, Valve, as a publisher, would handle conflicts on the users end. I used Cedega as a model as Cedega maintains 6 different versions of their Cedega Interface: Debian, Red Hat, Mandriva, Novell Suse, Gentoo / Slackware, and Apple OSX. However, Cedega only maintains one gaming engine. As far as installed games are concerned, they are presented with a unified and identical interface, regardless of what the actual base operating system is.
I still stand by my statements from that editorial. I still do think that a publisher like Valve, or EA, or Activision, or Take 2, isn't going to have a choice in moving into the Linux market. Right now, economic times are tough. The wider audience a software vendor can access, the more chances they have for a sale. The more chances a software vendor has for a sale, the more likely a sale is going to be made. Ignoring the Linux market hit Epic Software in the knees with Unreal Tournament 3, and Raven Software didn't fare well either with it's Linux ignoring Wolfenstein.
Bringing this back around to Cedega, or it's main competitor, Crossover Gaming, increased subscriptions can actually help improve the state of gaming on Linux. The term I'm looking for is market leverage. Lets say Transgaming has 10,000 6month subscribers. That's 10,000 people that Transgaming can take before a company like EA or Activision and tell them is a potential market. The larger subscriber base Transgaming, or Crossover has, the harder it is for game publishers to ignore the numbers. If Transgaming walked into EA's office and told EA that they had 500,000 subscribers, you can bet that EA would be putting Cedega Compatible stickers on every software product they sold.
Which brings up the killer point on WINE. Game Publishers do not like WINE. As an Open-Sourced project, WINE cannot be tracked. Nobody knows how many installs of WINE there are. If everything works properly, a Game Publisher would not be able to tell that a player is not using Windows.
The perception problem with WINE is further complicated by the usual F.U.D. springing forth from Microsoft. Microsoft has successfully convinced many publishers that Linux users are a bunch of free-loading pirates who don't pay for games. Microsoft's statement actually does have a nugget of truth. Many games that use rootkit like security methods, such as Securom, won't work on Linux. However, cracked or pirated versions of these games without the rootkits... will work perfectly. For this reason, Game Publishers like applications like Cedega and Crossover Gaming, as these proprietary applications largely try to leave a Game Publishers security system intact. WINE's free and open-source status, actually harm's the state of Linux Gaming.
There's also another complication involved between Cedega, Crossover Gaming, or just plain native clients. That complication is that most Game Publishers don't understand Multi-platform development.
The case in point here is FireFox, OpenOffice, Opera, and just about any product by Google. All of these popular and well known Open-Source products are built with a cross-platform focus in mind. When FireFox is updated, it's generally updated across all platforms at once. When OpenOffice receives an update, it's across all platforms at once. When Opera releases a new version, it's generally across all platforms... at once.
Game Publishers, however, approach similar, but different, platform as a separate projects. A company like Activision, for example, would allocate separate budgets for Playstation 3 and Xbox 360 versions of the same game. Despite the fact that the game engine is going to be shared, the content is going to be shared, and the development is largely going to be shared, the Publisher treats each version as though it were a separate game, with it's own separate sales data, and it's own separate budgetary allowances. So, when a product like Call of Duty launches, rather than simply checking to see how many units Call of Duty sold, Game Publishers look at the performance on different platforms. So if Call of Duty sold 3 million units on Xbox 360, and 1.5 million units on Playstation 3, and 2 million Units on Windows... what a normal person sees is 6.5 million copies of Call of Duty sold. What the Game Publisher sees is 3 million units of Game #1 on Xbox 360, 1.5 million units of Game #2 on Playstation 3, and 2 million units of Game #3 on Windows.
Some publishers, such as Capcom, realized that separated development was a bad idea and have reworked their internal studios to focus on a common source code build that can be easily ported into, then optimized, for various platforms.
This is why Linux is such a disconnect for Game Publishers and many Game Developers. Keeping with the Call of Duty example, rather than allocating the budget of the game to build a common source code version that could be ported into each architecture and then optimized for performance, and using Technologies that are shared across all potential platforms, the game is separated into 3 source code builds that are then worked on separately, and optimized separately. So when somebody asks about a Linux Client, an accountant starts figuring out the cost of creating a completely new source code build, and thus a completely new game, and comes to the decision that it just isn't worth the money. To a normal person, it's confusing as to why the Game Publisher didn't have the developer use Technologies that were multiplatform to begin with.
There is some hope on this multiplatform front. The success of the Apple Iphone and the various versions of Google Android have forced many publishers to redefine how they work with their mobile platforms. Suddenly using portable technologies like OpenGL, OpenAL, OpenCL, and the like, makes more sense than focusing on a vendor specific API. The hope is that the realization that using a common code base that's easily portable, rather than separated code bases, will strike publishers as a better development method.
Once developers and publishers wrap their heads around the fact that they can indeed create multiplatform content for not much more, if not any more, than it costs to create dedicated platform content, things stand to change. At that point, Publishers might realize that creating separate SKU's of their products for different PC platforms is just pointless. When creating the client for a game, go ahead and create clients for Linux, OSX, and Windows. Then partner with an online distribution client, such as Steam, and let the gamer buy the content. The online distributer takes care of making sure the gamer gets the right client for the game.
Until we reach that stage though, working with, and through, commercial companies like Transgaming, really is the best way to get the attention of publishers that their client base consists of more than just Windows users.
This blog normally orients towards technology matters, chewing out various news sites and their readers, but will also include the interests of one Very Grumpy Bunny.
Sunday, February 14, 2010
Cedega Install: Steam
Yet another install guide, this time we are looking at installing Steam through Cedega atop KDE4.
1: We want to start http://www.steampowered.com
Left Click on Get Steam Now in the Left Hand Bar
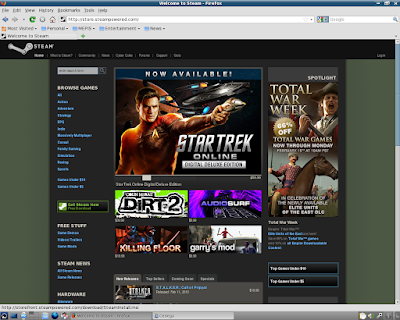
2: FireFox will want to save the file.
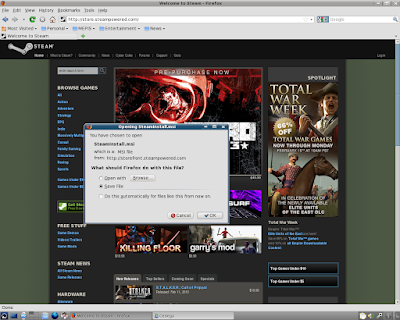
3: Lets check our download folder and make sure that SteamInstall.msi is there.
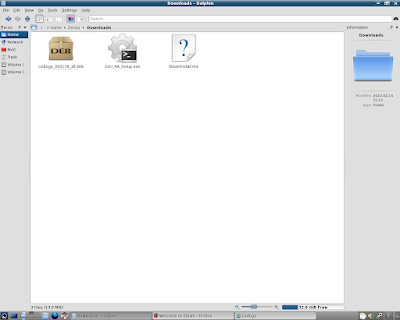
4: Okay, lets go over to Cedega and Left Click on Install.
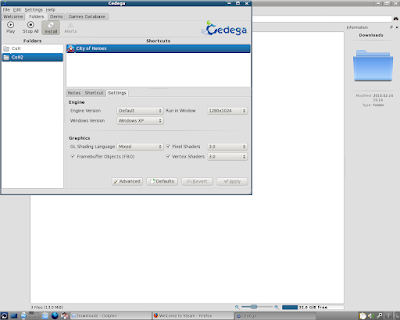
5: First thing we need to do is check our Game Folder
Currently it says CoH2
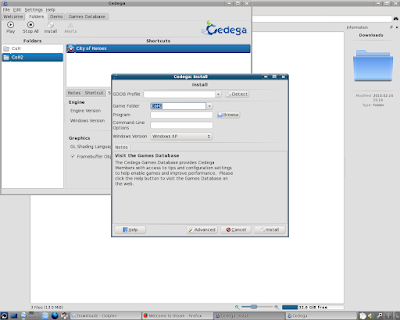
6: We need to rename the Game Folder.
Here I've renamed it to Steam.
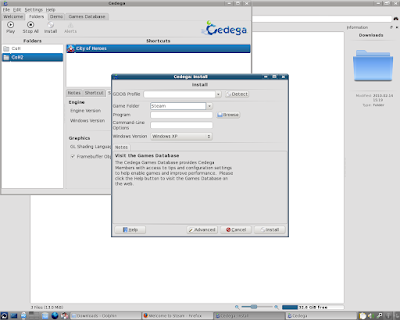
7: Now Left Click on Browse.
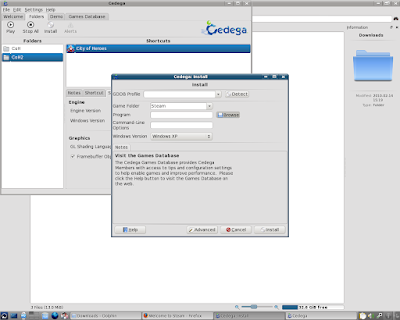
8: As always, Cedega starts with the CD/DVD drive.
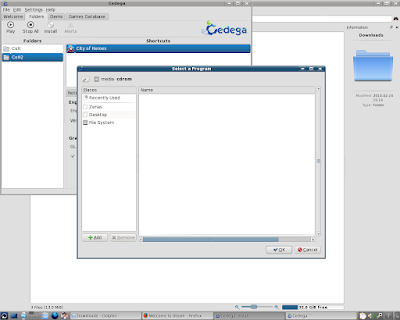
9: Navigate to the download folder
Left Click on SteamInstall.msi
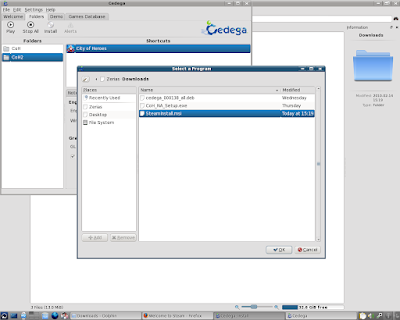
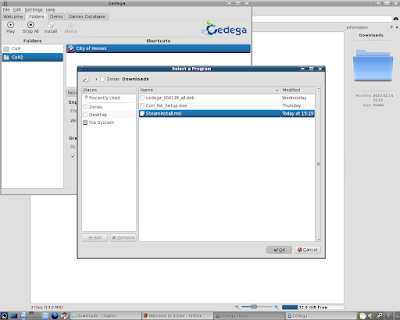
10: Left Click on OK.
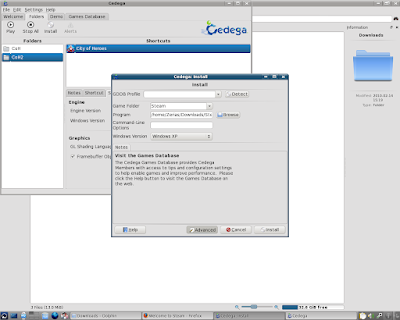
11: Like most game installs, we really want to be in a windowed mode.
Left Click on Advanced.
12: Left Click in the Drop Box for Run In Window and select a resolution.
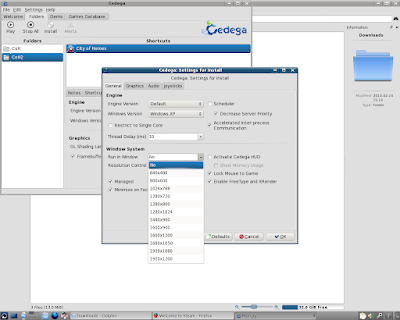
13: Since 1280*1024 is my desktop resolution, that's what I used.
Left Click on OK.
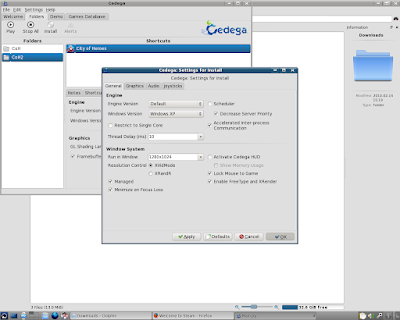
14: We should now be ready to Left Click on Install.
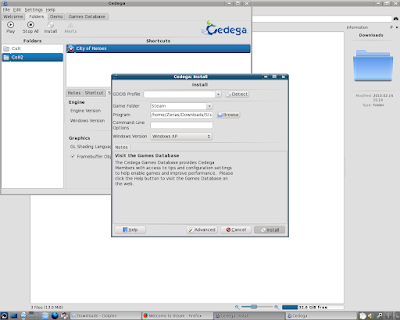
15: We should now be in the Steam Installer.
Left Click on Next.
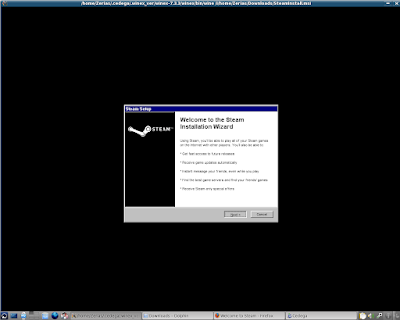
16: Remember, Steam is Licensed Software. You will need to agree to Steam's licenses to use the software.
If you agree, select I agree, then Left Click on Next.
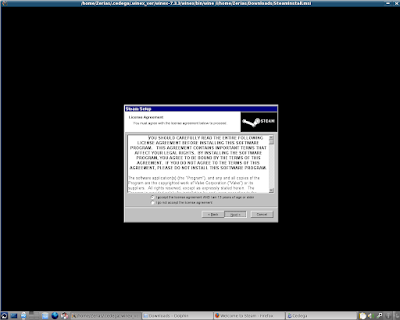
17: Steam will now ask for the approximate network speed.
Select your average download speed, then Left Click on Next.
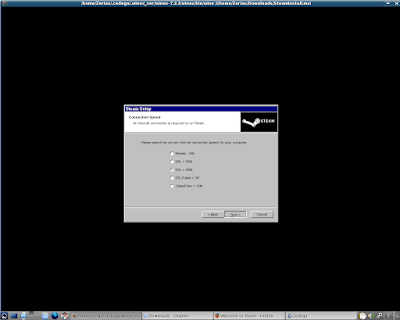
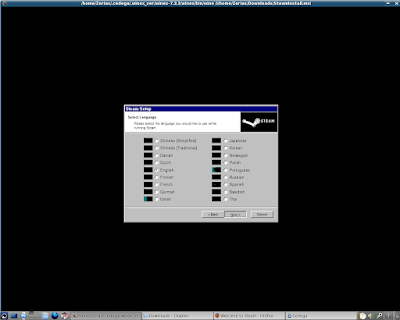
18: Don't worry too much about the graphical glitches.
Unless you need to select something other than English, on Left Click on Next.
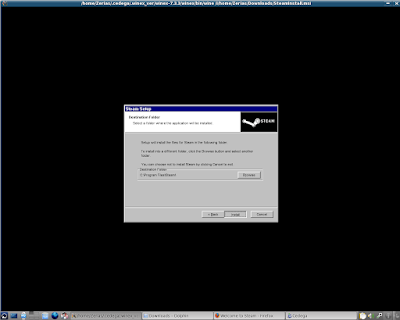
19: Left Click on Next to start the install process.
20: Depending on the speed of your computer, the install could take a few moments.
On Intel's I7 in use here, the Ksnapshot application didn't even have a chance to reload.
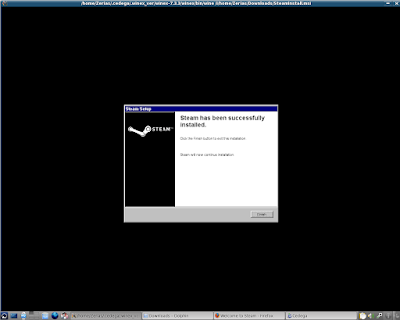
21: Left Click on Finish.
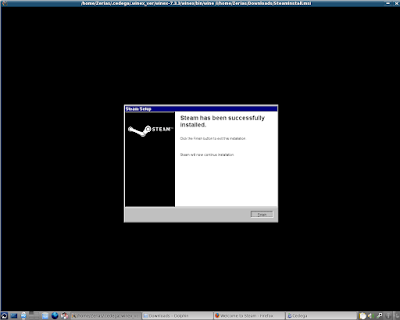
22: Don't... worry too much about any graphical corruption here. If Steam works correctly, it will shut off automatically.
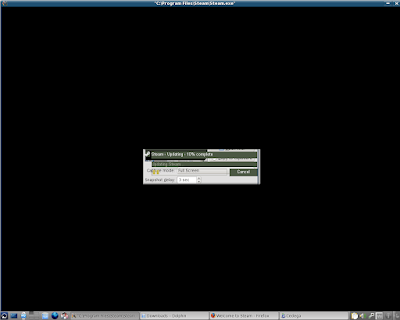
23: Unfortunately, or fortunately depending on your point of view, Cedega and WINE generally do not allow programs to automatically restart themselves. So we'll need to launch Steam manually to complete the installation.
From this point, we shouldn't need to worry about running in a windowed mode either, unless we are installing software that requires additional pop-ups.
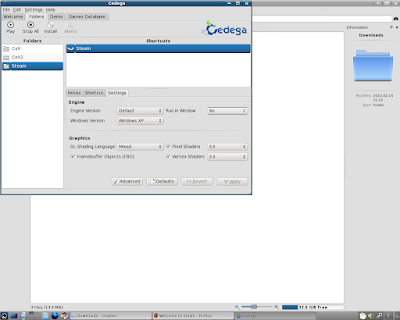
24: Left Click on Play.
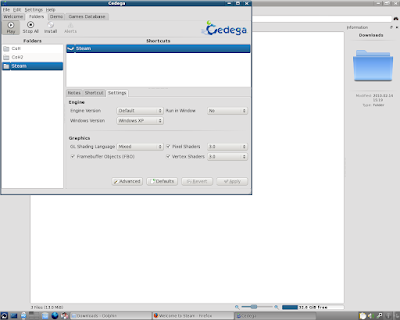
25: Now the Steam updater shows without graphical glitches.
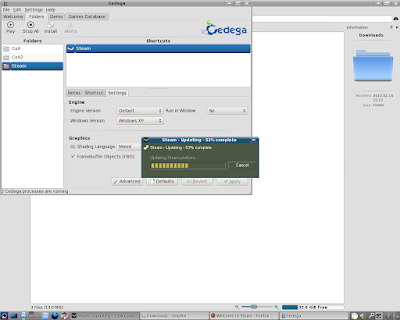
26: Eventually Steam will either ask you to either or Create an Account or Login to an Existing Account.
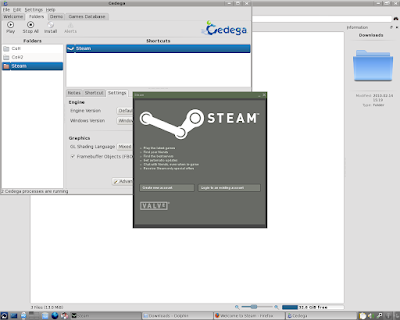
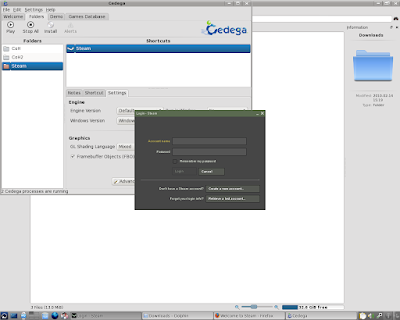
27: Since I already have a Steam Account, I just need to login.
28: Don't be surprised if Steam goes through another update after logging in.
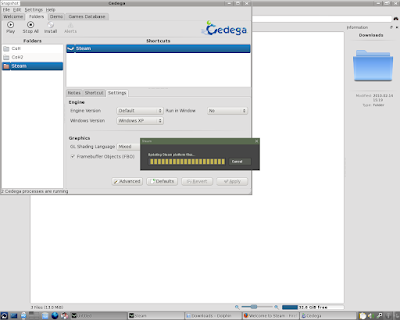
29: Steam is now loaded...
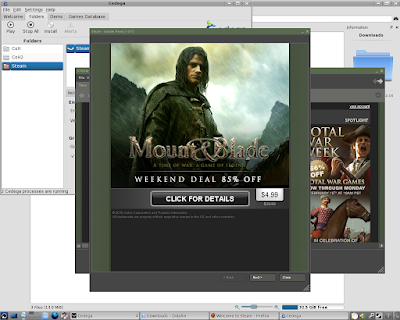
30: and you should be able to access your game files.
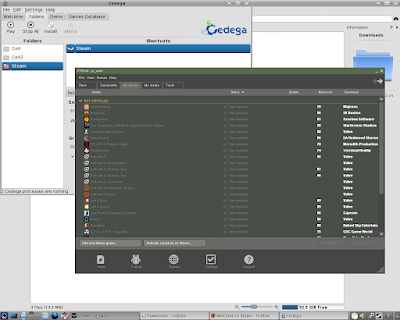
As an ending note, do keep in mind that you can generally install and view games in the Steam Browser that don't actually work under Cedega or WINE. So just because you have a game on Steam doesn't automagically mean it will work.
***
As a special note, I do need to extend thanks to Intel. The processor used for this guide system is one of their I7 Engineering Samples.
1: We want to start http://www.steampowered.com
Left Click on Get Steam Now in the Left Hand Bar

2: FireFox will want to save the file.

3: Lets check our download folder and make sure that SteamInstall.msi is there.

4: Okay, lets go over to Cedega and Left Click on Install.

5: First thing we need to do is check our Game Folder
Currently it says CoH2

6: We need to rename the Game Folder.
Here I've renamed it to Steam.

7: Now Left Click on Browse.

8: As always, Cedega starts with the CD/DVD drive.

9: Navigate to the download folder
Left Click on SteamInstall.msi

10: Left Click on OK.

11: Like most game installs, we really want to be in a windowed mode.
Left Click on Advanced.

12: Left Click in the Drop Box for Run In Window and select a resolution.

13: Since 1280*1024 is my desktop resolution, that's what I used.
Left Click on OK.

14: We should now be ready to Left Click on Install.

15: We should now be in the Steam Installer.
Left Click on Next.

16: Remember, Steam is Licensed Software. You will need to agree to Steam's licenses to use the software.
If you agree, select I agree, then Left Click on Next.

17: Steam will now ask for the approximate network speed.
Select your average download speed, then Left Click on Next.

18: Don't worry too much about the graphical glitches.
Unless you need to select something other than English, on Left Click on Next.

19: Left Click on Next to start the install process.

20: Depending on the speed of your computer, the install could take a few moments.
On Intel's I7 in use here, the Ksnapshot application didn't even have a chance to reload.

21: Left Click on Finish.

22: Don't... worry too much about any graphical corruption here. If Steam works correctly, it will shut off automatically.

23: Unfortunately, or fortunately depending on your point of view, Cedega and WINE generally do not allow programs to automatically restart themselves. So we'll need to launch Steam manually to complete the installation.
From this point, we shouldn't need to worry about running in a windowed mode either, unless we are installing software that requires additional pop-ups.

24: Left Click on Play.

25: Now the Steam updater shows without graphical glitches.

26: Eventually Steam will either ask you to either or Create an Account or Login to an Existing Account.

27: Since I already have a Steam Account, I just need to login.

28: Don't be surprised if Steam goes through another update after logging in.

29: Steam is now loaded...

30: and you should be able to access your game files.

As an ending note, do keep in mind that you can generally install and view games in the Steam Browser that don't actually work under Cedega or WINE. So just because you have a game on Steam doesn't automagically mean it will work.
***
As a special note, I do need to extend thanks to Intel. The processor used for this guide system is one of their I7 Engineering Samples.
Cedega Install: City of Heroes Test Server
Okay, here we go with installing the Test Server for City of Heroes under Cedega. Now, this guide somewhat presumes that the base City of Heroes game is already installed. I also started this guide while waiting on the Live Server was crunching through game file verification, so don't get thrown off by the task bar entries.
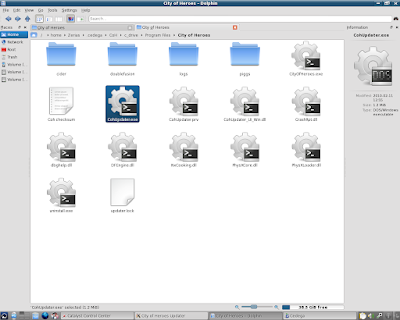
1: The file that we need to start the test server install is CohUpdater.exe
As this system already has a live install of the City of Heroes game, I can find the file under the /home/(username)/.cedega/CoH/c_drive/Program Files/City of Heroes folder that was created in the last guide.
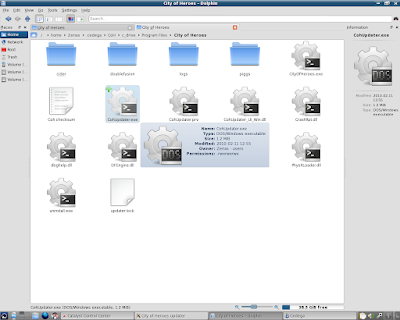
2: We want to Copy the CohUpdater.exe file.
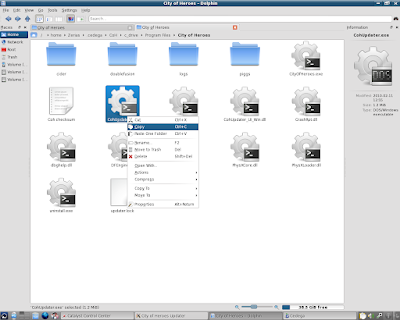
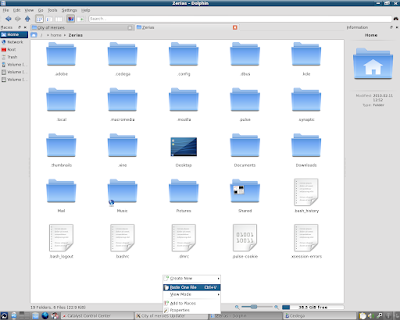
3: Lets Left Click on Home in the Left Hand Bar.
4: Paste the CohUpdater.exe file into the /home/(username) folder.
5: Now we can go to Cedega and Left Click on Install.
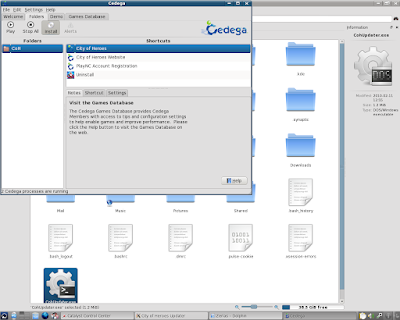
6: In the install window we see that Cedega has defaulted to our already existing CoH folder. We'll need to change that in a minute.
For now Left Click on Browse.
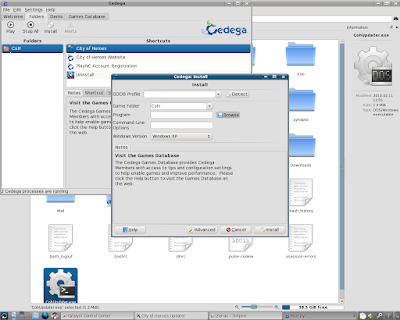
7: As always, Cedega defaults to the CD/DVD drive.
Left Click on the (Username) in the Left Hand Bar.
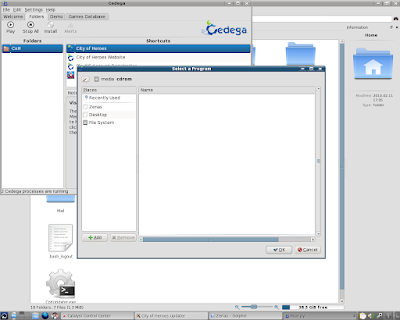
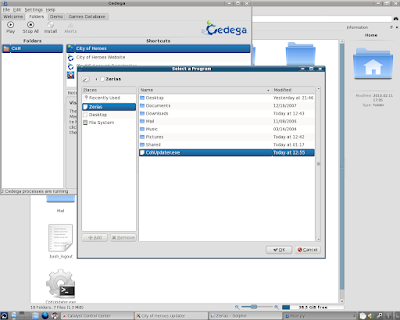
8: We should be taken right to the folder with CohUpdater.exe.
Left Click on CohUpdater.exe
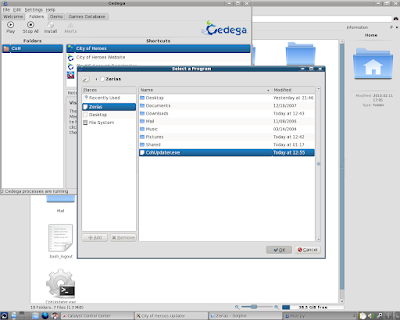
9: Then Left Click on OK.
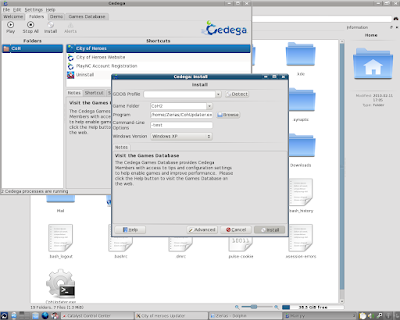
10: Go ahead and change the Folder Name.
Here, I've changed it to CoH2.
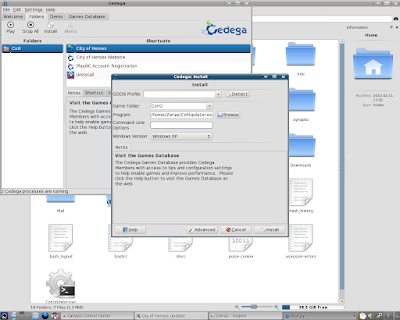
11: In the Command Line Options field, type in the text entry: -test
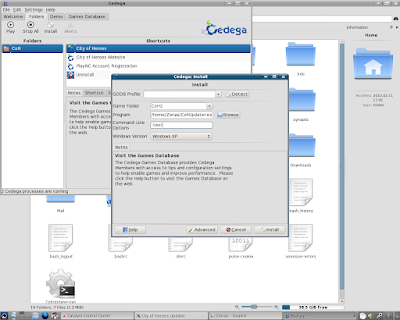
12: As with the live install, we'll want to set a windowed mode.
Left Click on Advanced.
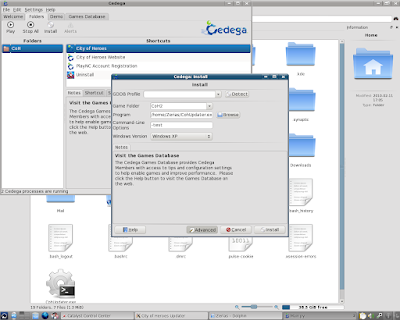
13: Select your Desktop, or desired, resolution under Run in Window.
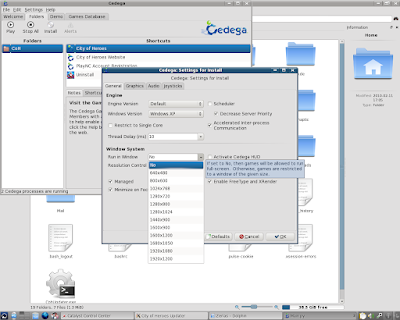
14: Here I've chosen 1280*1024.
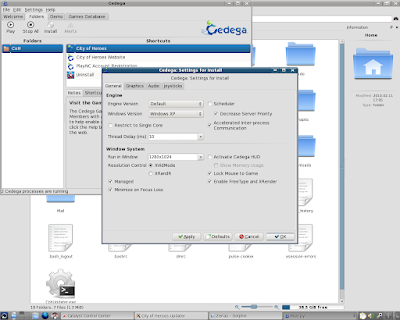
15: Left Click on OK.
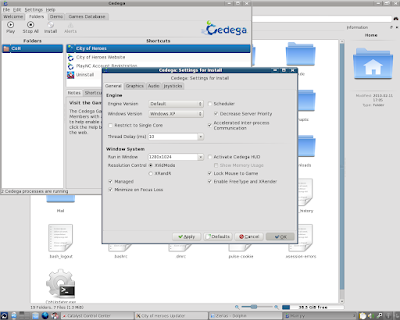
16: We should be good to go, so Left Click on Install.
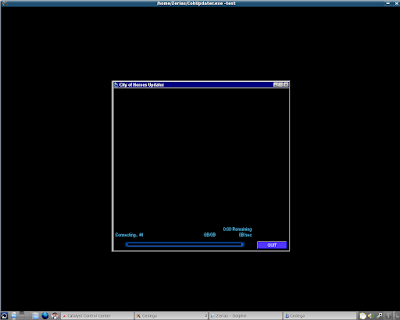
17: We should now have the City of Heroes launcher on the screen...
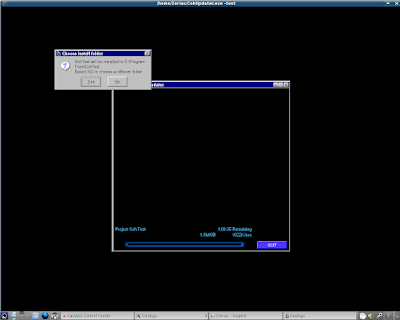
18: Then we should get a Dialog Box asking where to install the game. Chances are, if you didn't set a windowed mode, this dialog box will not display.
Left Click on Next.
19: City of Heroes will start to download the files. As in the first guide, I'm going to cheat a bit.
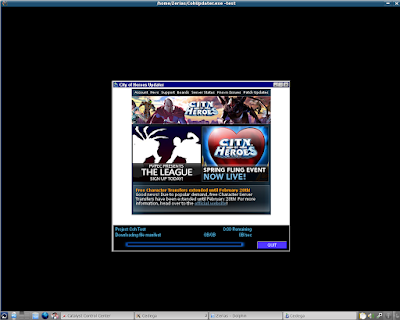
20: While we wait for the installer to download the base files, I'm going to go ahead and go to /home/(username)/.cedega in Dolphin.
Here we can see our new folder, CoH2.
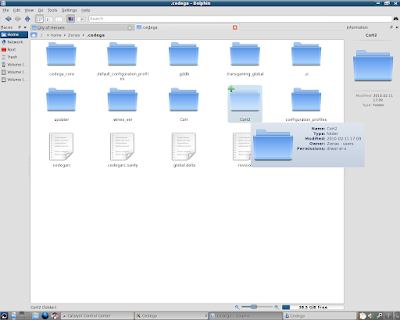
21: Under CoH2 is a new c_drive
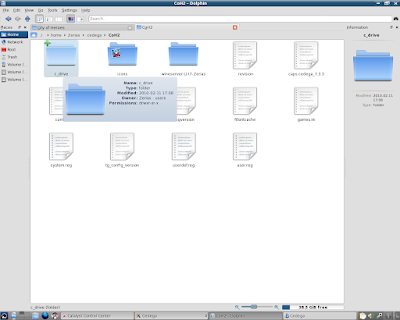
22: A new Program Files
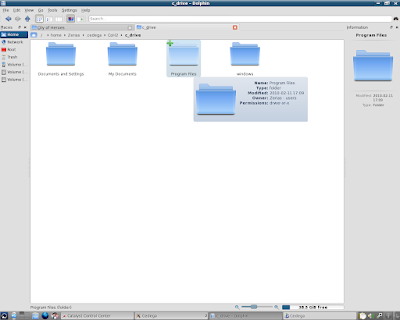
23: Here we see the primary difference from the and the Live Server Install and the Test Server Install.
Our game folder is CohTest.
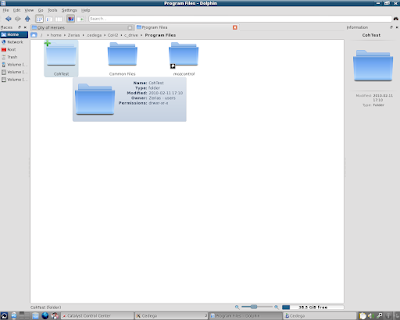
24: Here we can see some of the base files are already in place.
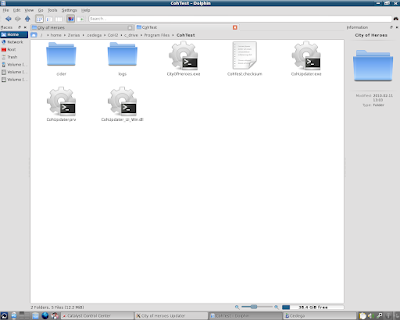
25: At this point, I'm going to go ahead and Close the City of Heroes Launcher.
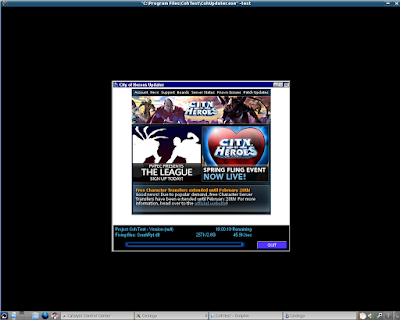
26: In the last guide I had opened up a Flash Drive with a copy of a Windows Install.
The folder /media/disk/City of Heroes is still the first tab under Dolphin.
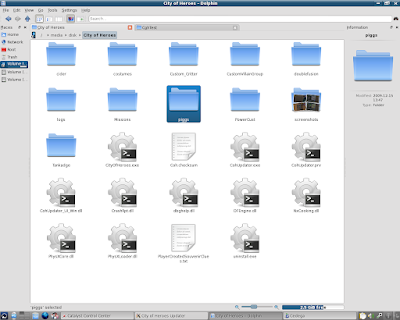
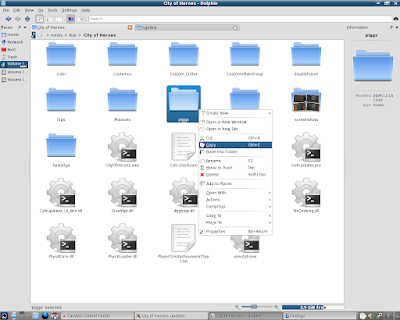
27: As before, I'm going to Copy the piggs folder.
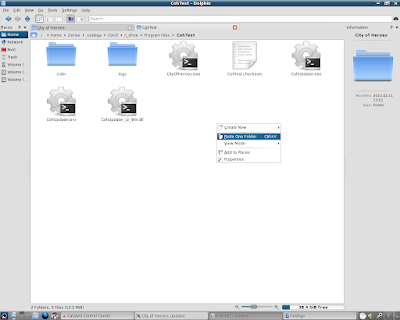
28: The second tab under Dolphin is still /home/(username)/.cedega/CoH2/c_drive/Program Files/CohTest.
I'm going Paste the piggs folder into the CohTest folder.
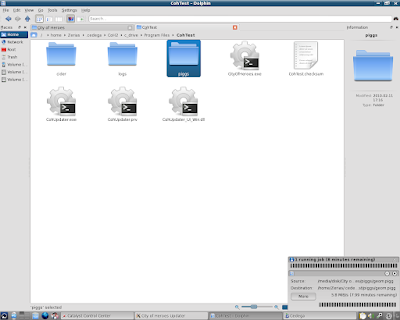
29: Once again, since the piggs folder is the majority of the game data, the copy could take a while.
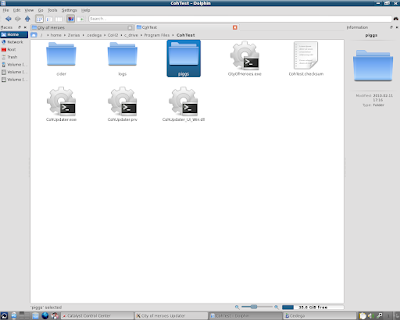
30: Once the copy is finished, we can go back to Cedega.
31: Before we launch the game again, we do need to make a few adjustments.
Left Click on the Settings Tab, if it's not already selected.
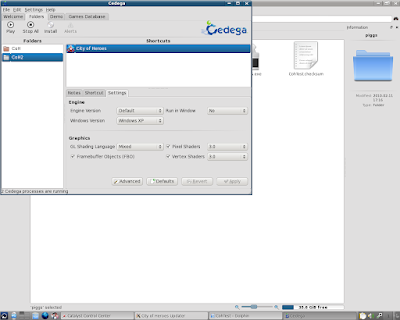
32: Go ahead and set a windowed mode for the game:
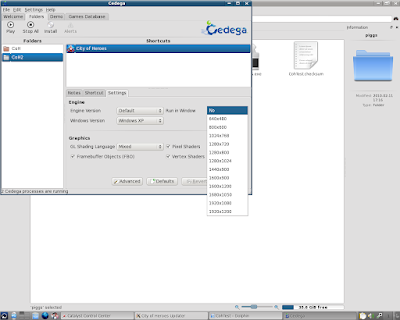
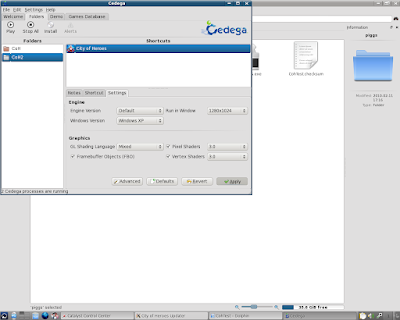
33: with a windowed mode set, Left Click on Apply.
34: Now Left Click on the Shortcut Tab.
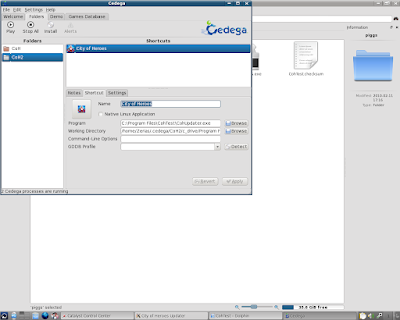
35: Under Command Line Options, type in the text entry: -test
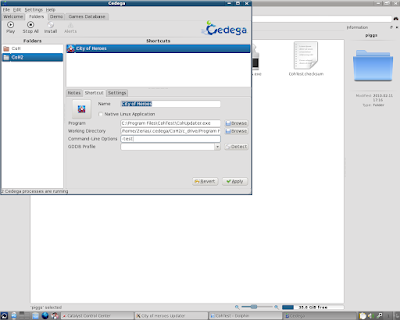
36: Then Left Click on Apply.
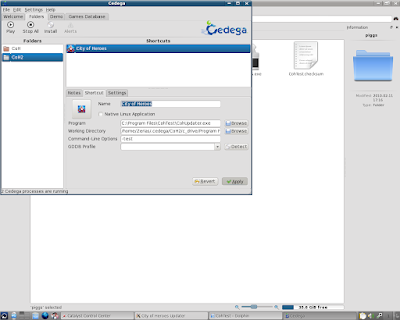
37: We'll probably be dropped back to the Left Hand Window selection.
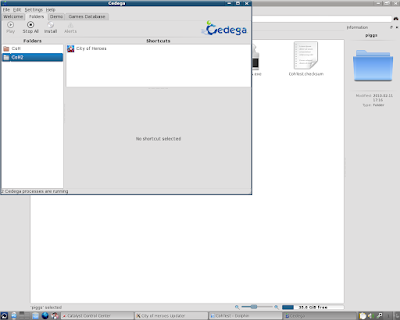
38: So, Left Click on City of Heroes under CoH2
Then Left Click on Play.
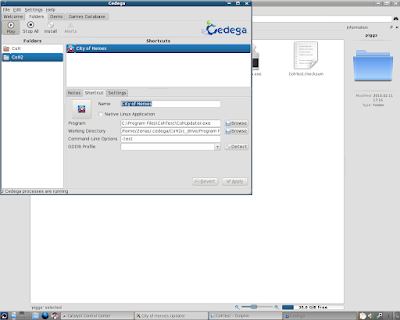
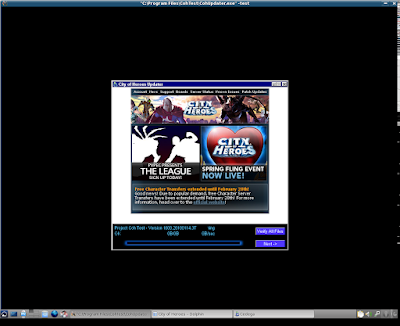
39: The installer should launch and start to work on updating the piggs and other files to test version.
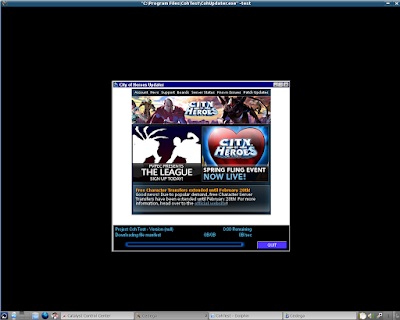
40: Once the test server is finished loading, we can try to play.
41: Once again, as I'm doing this on ATi hardware, and the Ultra Mode fixes haven't arrived yet, I'm greeted with screen corruption.
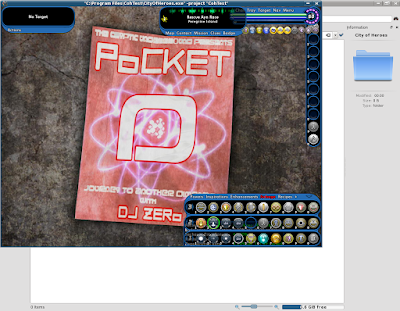
42: The fix is the same as on the Live Server.
Left Click on Menu.
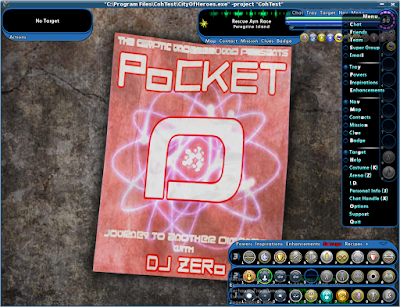
43: Left Click on Options.
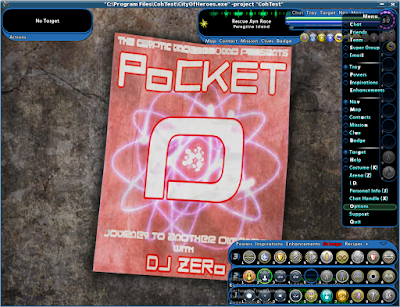
44: Left Click on the Graphics and Audio Tab.
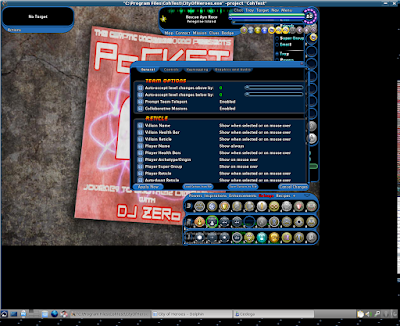
45: Left Click on Advanced Graphical Settings
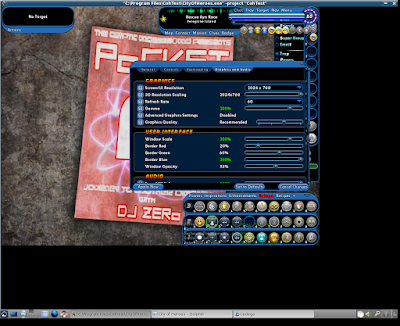
46: The Advanced Graphical Settings should now be disabled.
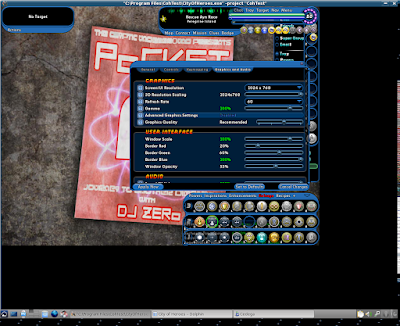
47: Left Click on Water Effects TWICE.
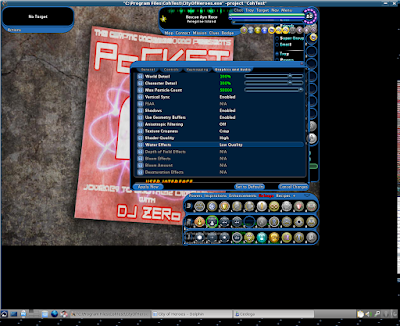
48: Water Effects should now be set to None.
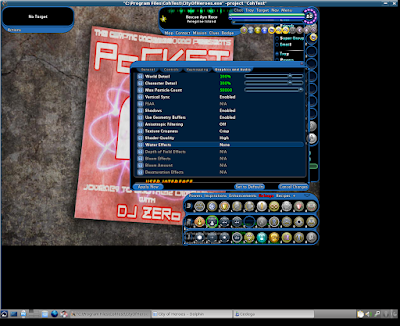
49: Left Click on Apply Now.
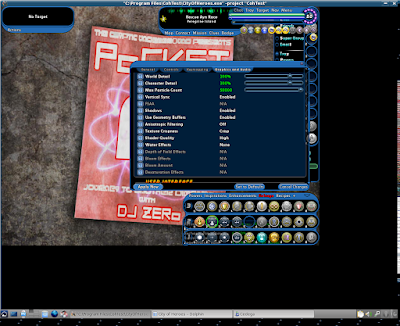
50: The screen corruption should clear right up.
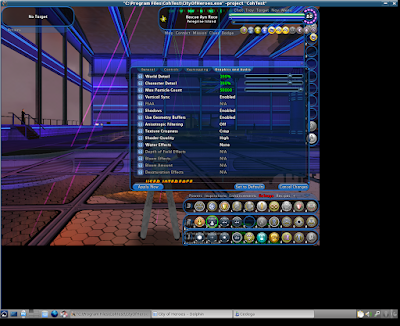
51: Now, you might notice that although this system supports OpenGL 3.0 and is running an OpenGL 3.2 driver, several of the shader affects are disabled.
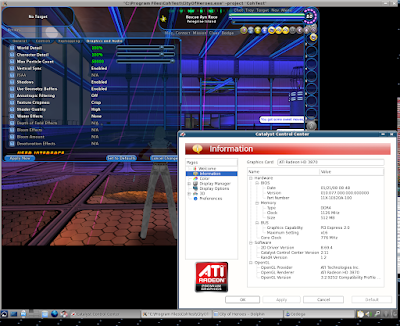
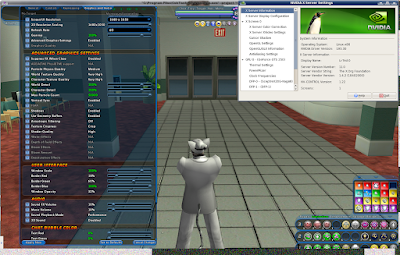
As I mentioned in the Live Server Install, the Water Effects option that causes corruption on the ATi drivers is actually disabled under equivalent hardware from Nvidia. Specifically the Triple-SLI GTS 250 system with the 195.30 driver set.
Nvidia - Live
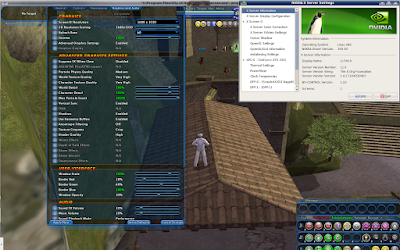
Nvidia - Test
52: With our graphical corruption cleared up, we can once again set a new resolution for City of Heroes.
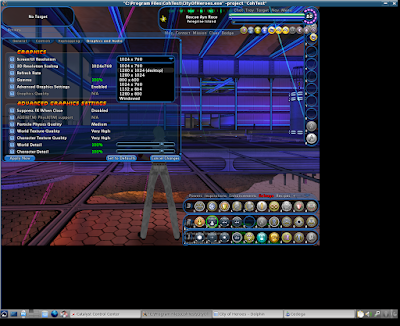
53: As in the Live Server Install, we'll need to restart to see the changes.
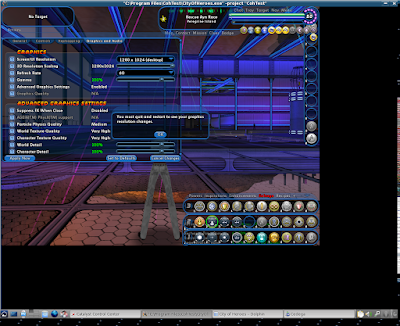
54: So once again, Quit to Login Screen.
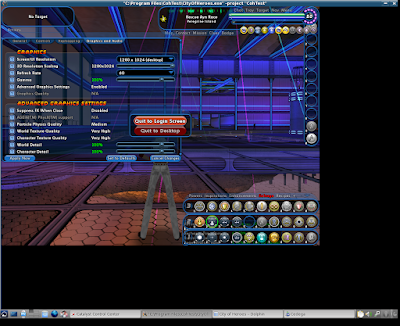
55: Left Click on Exit
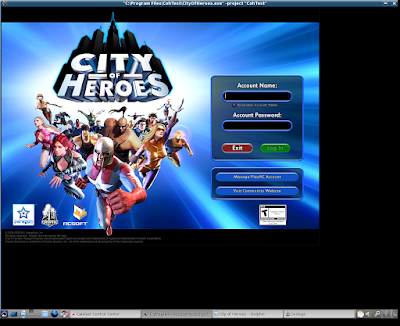
56: Launch the game again...
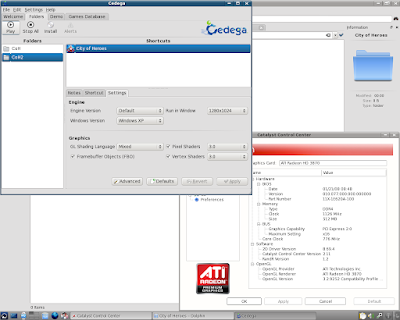
57: We should now be in full resolution. As in the live server guide, if you want to turn windowed mode off, you can do so through the Cedega User Interface.
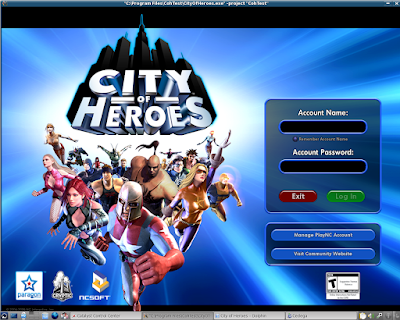
So there we go, installing the Test Server through Cedega.
And yes, I used pre-existing characters on purpose. You'll just have to wait for the NDA's to lift.
***
As a special note, I do need to extend thanks to Intel. The processor used for this guide system is one of their I7 Engineering Samples.
1: The file that we need to start the test server install is CohUpdater.exe
As this system already has a live install of the City of Heroes game, I can find the file under the /home/(username)/.cedega/CoH/c_drive/Program Files/City of Heroes folder that was created in the last guide.

2: We want to Copy the CohUpdater.exe file.

3: Lets Left Click on Home in the Left Hand Bar.

4: Paste the CohUpdater.exe file into the /home/(username) folder.

5: Now we can go to Cedega and Left Click on Install.

6: In the install window we see that Cedega has defaulted to our already existing CoH folder. We'll need to change that in a minute.
For now Left Click on Browse.

7: As always, Cedega defaults to the CD/DVD drive.
Left Click on the (Username) in the Left Hand Bar.

8: We should be taken right to the folder with CohUpdater.exe.
Left Click on CohUpdater.exe

9: Then Left Click on OK.

10: Go ahead and change the Folder Name.
Here, I've changed it to CoH2.

11: In the Command Line Options field, type in the text entry: -test

12: As with the live install, we'll want to set a windowed mode.
Left Click on Advanced.

13: Select your Desktop, or desired, resolution under Run in Window.

14: Here I've chosen 1280*1024.

15: Left Click on OK.

16: We should be good to go, so Left Click on Install.

17: We should now have the City of Heroes launcher on the screen...

18: Then we should get a Dialog Box asking where to install the game. Chances are, if you didn't set a windowed mode, this dialog box will not display.
Left Click on Next.

19: City of Heroes will start to download the files. As in the first guide, I'm going to cheat a bit.

20: While we wait for the installer to download the base files, I'm going to go ahead and go to /home/(username)/.cedega in Dolphin.
Here we can see our new folder, CoH2.

21: Under CoH2 is a new c_drive

22: A new Program Files

23: Here we see the primary difference from the and the Live Server Install and the Test Server Install.
Our game folder is CohTest.

24: Here we can see some of the base files are already in place.

25: At this point, I'm going to go ahead and Close the City of Heroes Launcher.

26: In the last guide I had opened up a Flash Drive with a copy of a Windows Install.
The folder /media/disk/City of Heroes is still the first tab under Dolphin.

27: As before, I'm going to Copy the piggs folder.

28: The second tab under Dolphin is still /home/(username)/.cedega/CoH2/c_drive/Program Files/CohTest.
I'm going Paste the piggs folder into the CohTest folder.

As a note, if you didn't cheat on the first guide, you can use the piggs folder from the first install, which in this case would be under /home/(username)/.cedega/CoH/c_drive/Program Files/City of Heroes.
The reason why I didn't use the existing live install is that it was still installing, as evidenced by the City of Heroes Updater still running in the task bar.
29: Once again, since the piggs folder is the majority of the game data, the copy could take a while.

30: Once the copy is finished, we can go back to Cedega.

31: Before we launch the game again, we do need to make a few adjustments.
Left Click on the Settings Tab, if it's not already selected.

32: Go ahead and set a windowed mode for the game:

33: with a windowed mode set, Left Click on Apply.

34: Now Left Click on the Shortcut Tab.

35: Under Command Line Options, type in the text entry: -test

36: Then Left Click on Apply.

37: We'll probably be dropped back to the Left Hand Window selection.

38: So, Left Click on City of Heroes under CoH2
Then Left Click on Play.

39: The installer should launch and start to work on updating the piggs and other files to test version.

40: Once the test server is finished loading, we can try to play.

41: Once again, as I'm doing this on ATi hardware, and the Ultra Mode fixes haven't arrived yet, I'm greeted with screen corruption.

42: The fix is the same as on the Live Server.
Left Click on Menu.

43: Left Click on Options.

44: Left Click on the Graphics and Audio Tab.

45: Left Click on Advanced Graphical Settings

46: The Advanced Graphical Settings should now be disabled.

47: Left Click on Water Effects TWICE.

48: Water Effects should now be set to None.

49: Left Click on Apply Now.

50: The screen corruption should clear right up.

51: Now, you might notice that although this system supports OpenGL 3.0 and is running an OpenGL 3.2 driver, several of the shader affects are disabled.

As I mentioned in the Live Server Install, the Water Effects option that causes corruption on the ATi drivers is actually disabled under equivalent hardware from Nvidia. Specifically the Triple-SLI GTS 250 system with the 195.30 driver set.
Nvidia - Live

Nvidia - Test

52: With our graphical corruption cleared up, we can once again set a new resolution for City of Heroes.

53: As in the Live Server Install, we'll need to restart to see the changes.

54: So once again, Quit to Login Screen.

55: Left Click on Exit

56: Launch the game again...

57: We should now be in full resolution. As in the live server guide, if you want to turn windowed mode off, you can do so through the Cedega User Interface.

So there we go, installing the Test Server through Cedega.
And yes, I used pre-existing characters on purpose. You'll just have to wait for the NDA's to lift.
***
As a special note, I do need to extend thanks to Intel. The processor used for this guide system is one of their I7 Engineering Samples.
Subscribe to:
Comments (Atom)